Sunday, 22 March 2015
Friday, 6 March 2015
Making Windows 7 Bootable USB - Using CMD
Creating a usb pendrive using command prompt is not hard, it is one of the most common ways to create a bootable usb.
This method does not work if your operating sistem is windows xp or windows 8 , you cannot select the primary partition in comand prompt.
You just need to follow these simple steps:
This method does not work if your operating sistem is windows xp or windows 8 , you cannot select the primary partition in comand prompt.
You just need to follow these simple steps:
- First step is to obtain the windows files from somewhere and save them to a folder in your pc. You can rip a windows dvd , or if you have the iso image file you can open it with magic disc or daemon tools or even winrar , and you need to copy the whole content to a folder anywhere in your pc , you just need to make sure you know where it is located.
- Make sure your usb stick is inserted, go to start search cmd , right click the file and select run as administrator. The command prompt will appear, now you need to write the following comands:
- diskpart→list disk→select disk 1(chose the usb device, you will recognize it by its size)→clean(this will erase the usb)→create partition primary→select partition 1→active→format fs=ntfs(this will format the usb drive and will take 10-15 minutes)→
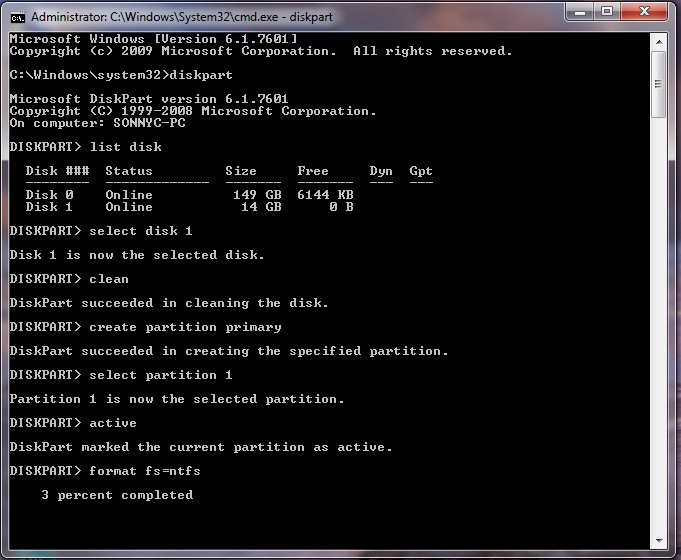
- After the format is done you have to continue writting in command promt : →assign(now you will notice that the usb drive changed its letter to (H): or (G))→exit(this command will exit the disk part function)
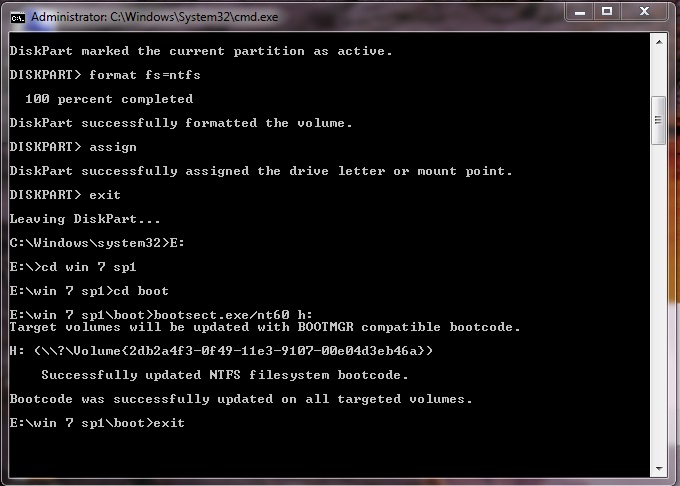
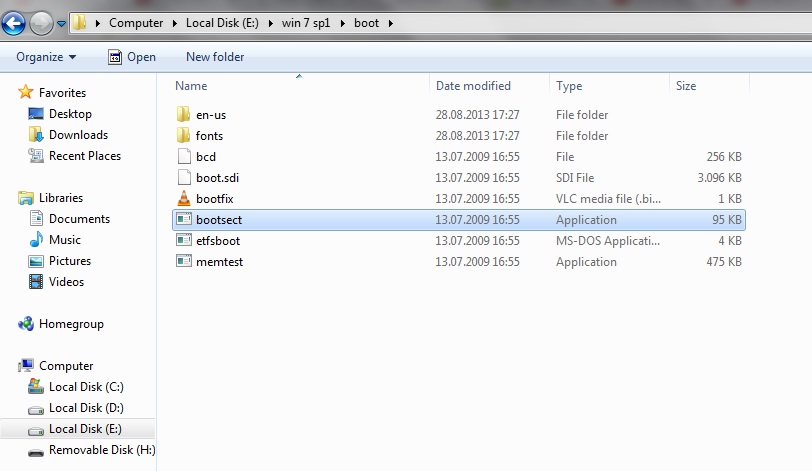
- Now you have to write the path to the executable file in your
windows saved folder , make sure that in your windows folder you have
the boot folder with the bootsect executable file.
- In my case the command goes like this: E:→cd win 7 sp1→
- Now you have to copy all the files in the windows folder to your usb drive.
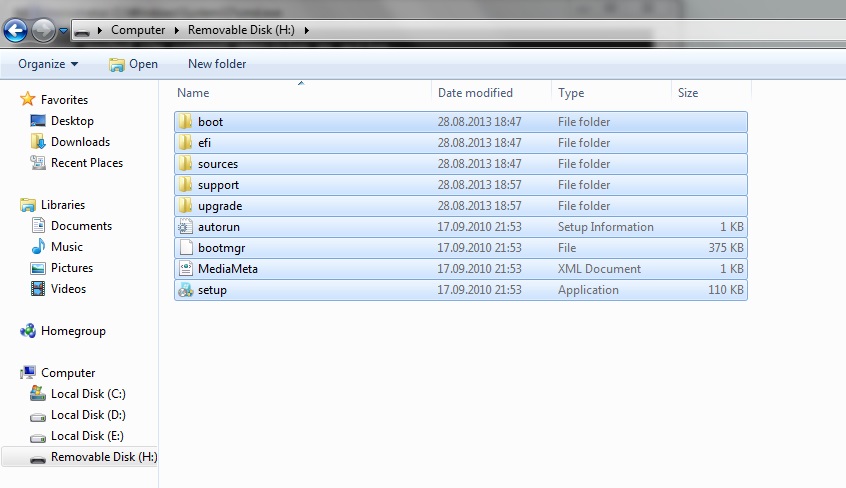
- ALL DONE. You can now restart your pc and boot from the usb hard drive.
Wednesday, 4 March 2015
Iron Man - Pc Game
Download This Game
 Iron Man Game System Requirements
> Operating System : Windows XP/Windows 7/Windows 8 and 8.1
> Processor : Dual Core 1.9 GHz
> Ram : 1GB
> Hard Disk Space : 6 GB
>Size : 206.33 MB
Command Prompt Basics - A Getting Started Guide
Many of the troubleshooting techniques you will find on the internet
make use of the DOS or Command Prompt. This is how computers used to
work before the mouse became common. You have to type in your commands.
This site will give you a quick overview of how the command prompt
works. Initially it starts with showing you how to move around your file
system. When it comes to running more advanced commands, this basic
information will help because different commands need to be run from
different directories.
This information was formally on amset.info, but has now been moved to its own separate domain. You may have been redirected here from amset.info.
Throughout this page you will see this referred to as a command prompt. DOS Prompt and Command Prompt are the same thing.
You should have a Command Prompt open when reading this page so that you can try the commands. Unless stated, you will not damage your data by just moving around your folders.
Opening a Command Prompt
There are two conventional ways to start a Command prompt.
The screenshot below shows a Command Prompt on Windows 7 - it is almost identical on all other versions of Windows.

Command Prompt on Windows Vista, Windows 7 and Windows 2008
On Windows Vista and Windows 7, a standard Command Prompt may not allow you to do everything that you need to. In that case you will need to use an elevated command prompt.
The best way to start an elevated command prompt is to RIGHT click on the shortcut and choose Run As Administrator.
How to tell if the command prompt is elevated
If the prompt is elevated, then the initial path will be C:\Windows\System32. The title bar will also say "Administrator: Command Prompt". If the prompt is not elevated then by default it will start in C:\Users\Username (where username is the username of the account in use) and the title bar will just say "Command Prompt". The example above was configured to start in C:\ .

Closing a command prompt
You can close a command prompt either by clicking on the cross in the corner, typing exit and pressing enter, or choosing Close when right clicking the Command Prompt icon on the task bar.
However command history is not maintained across sessions, so if you have a lengthy command that you want to use again, it needs to be copied out.
Command Prompt Basics
When you are working in Command Prompt, there are a couple of things that usually work:
Many of the commands will have extra options available, known as switches. They are added to the command by entering a "/" then a letter, number or word. These can change how the tool works or handles the information. A common switch would be the help command, which will also give you information on the other switches available.
"command" /?
This will usually bring up information about the command and the available switches. If it doesn't work, try "-?" after the command instead.
"command" > "filename.txt"
This will send the results of the command to a text file instead of the screen. You can include switches as well. This is particularly useful if you are looking at the help information for a command. Look at this example command:
xcopy /? >c:\xcopy.txt
This writes the content of the help command to a file called xcopy.txt located in the root of the C:\ drive.
Stopping a Command
If you start a command it appears to be looping, showing more than you expect, then you can stop it sing the key combination CTRL-C.
If you are interested in simply allowing the text to show, but a screen at a time, then you should use the MORE command.
Copy and Pasting a command in to the window
The first thing to note, which will usually catch newcomers to the Command Prompt out, is that the usual CTRL-C and CTRL-V commands will not work for a command prompt window.
Copying Text
To copy text, such as a long command that you have been using or the results of a command, click on the icon in the top LEFT corner, and then choose Edit, and Mark.

The cursor will then change. You can then use the mouse to highlight the text that you want to copy. Once you have done so, press enter. The highlight will disappear, and the text will be copied in to the clipboard. You can then copy it elsewhere, or in to the same Command Prompt Window.
Pasting Text
To paste text, move the cursor to the point where you want to enter it, using the cursor keys. Then click on the icon in the top left corner and choose Edit, Paste.
CLS
If you have lots of text in your Command Prompt window, this command will clear it. The history of previous commands typed in that session will be maintained.
Moving Between Folders, Listing Folder Contents
There are two commands you will use most
The "Dir" command is probably the most basic command. It gives you a listing of all the files and folders that are located in the folder that you are currently open in.
For example, in the screenshot above, we are in the root of the C:\ drive. If a DIR command is carried out at this point, then you will get a result similar to this:
Volume in drive C is System
Volume Serial Number is 1234-5678
Directory of C:\
25/10/2002 23:42 0 AUTOEXEC.BAT
26/10/2002 01:03 0 COMLOG.txt
25/10/2002 23:42 0 CONFIG.SYS
06/02/2003 15:08 0 dir.txt
04/11/2002 20:40 262,144 ntuser.dat
25/10/2002 23:49 <DIR> Documents and Settings
27/01/2003 19:58 <DIR> Program Files
27/01/2003 09:26 <DIR> WINDOWS
5 File(s) 262,144 bytes
3 Dir(s) 12,528,111,616 bytes free
This command does not show you any hidden files. To see hidden files you will need to use the ATTRIB command.
Advanced "dir" commands
You can get a little more advanced with the dir command by putting extra commands after the intitial "dir".
For example:
dir /s
will show the contents of the current folder, and any subfolders that are below. This will produce a very long file listing. You might want to filter the results or send them to a text file (see above).
dir /s something.doc
This command will search through all subdirectories below for a file that matches that file name. Similarly, issuing the command
dir /s *.doc
will list all files that end in .doc (Word files).
More information on the DIR command can be found in the DIR Command Reference.
CD - Change Directory
The CD command is very simple to use. All commands are relative to the directory that you are in. Therefore, using the example output of a "dir" that is shown above, if you want to change to the "Windows" directory, you would type
CD Windows
If you want to change to the "system" directory (which is a sub directory of "windows"), you would enter
CD System
However if you knew that you wanted to change to the system directory immediately, you could type this command instead:
CD Windows\System
However if you were already deep in another directory (for example c:\ documents and settings \username\ local settings) and then wanted to move directly to windows\system then you can do that by putting in an initial backwards slash:
CD \Windows\System
This tells the command to go to the root of the drive, then to the directory Windows and system.
Moving Back Up
You can also move back up the tree, instead of down.
If you want to just return to the root of the drive (C:\) you would just type
cd \ or cd\
If you wanted to just go back one level (to use the earlier example, you were in c:\windows\system and you wanted to be in c:\windows) you would just type:
cd..
Alternatively, if you want to access a totally different directory, for example "Program Files" you could type
cd program files or cd "program files"
When typing directories to change to, if the directory name is unique, then you can use wild cards. For example
cd program*
Directory Entry Shortcut: : If you are on Windows 2000 or XP and you have a Windows Explorer screen open at the location that you want to run a Command Prompt command you could open the Command Prompt and typing a long series of directories or CD commands. Instead, just type CD and then a space, then drag and drop the directory you want to work in to the Command Prompt window. The full path to the directory will be entered, ready for you to press enter.
More information on the CD command can be found in the CD Command Reference.
Change Drive
If you want to run a command against a directory on another drive, such as the D drive, then you need to change to that drive, This is done simply by entering the drive letter and a colon:
d:
On Windows Vista and higher you can also combine the drive letter change and directory by using the full path:
cd d:\downloads
On Windows XP and older, you can still enter the above command, but will then need to do d: . When you do, you will find that you are in the directory where you did the CD command to.
File Renaming
You can rename files in a command prompt.
rename something.txt someone.txt
would rename the file something.txt to someone.txt
Full Rename Command Reference.
Directory Creation
You can create directories from the command prompt:
mkdir something
would create a directory called "something".
If you want a directory with a name that has a space in it, such as "My Files" you need include the command in " ":
mkdir "my files"
This ensures that the directory is created with the space. Without the space you will get a new directory called "my" and an error message.
You can also use the md command instead of mkdir.
Windows Power Toys
If you do a lot of work in the command prompt, then you might be interested in installing the "Command Prompt Here" (Windows 9x, NT and 2000) or "Command Here" (Windows XP) Power Toys. These add a new command the right click menu you get when you click on a directory allowing you to open a Command Prompt in that directory.
You can download these Power Toys from Microsoft's web site.
Changing where the Command Prompt shortcut starts
By default, the command prompt will start in your Home directory. This could be "C:\Documents and Settings\Username" or a network drive. If you want to always start in another location, such as the root of the C: drive, then you can change the Shortcut. Right click on it and choose Properties. Change the value in "Start In" to your preferred location.
Keyboard Short Cuts
There are a couple of shortcuts that you can use from the keyboard instead of typing full directory paths.
Use a Wild Card
If the directory you are wanting to change to is very long but uniquely named, then you can use a wild card instead of typing the entire thing.
For example, instead of:
cd "program files"
you could enter
cd prog*
Enter the wildcard character once you have typed enough characters for Windows to only have one choice.
Using "Tab" to Select Files or Folders - Windows XP/Server 2003 only
Another neat trick if you are using a command prompt on Windows XP or Windows Server 2003 and is to use the "Tab" key to scroll through the files and folders in the current directory. Type the command you want to use as normal, for example "cd" then press tab to cycle through the files and folders until you reach the one you want. Then press enter. You may still have to enter the " as before, so would type " cd " " then press tab until you reached the folder you want to change to, enter the second " to finish off and press enter.
This technique can save a lot of time if you need to change to a directory with a long name.
It will also let you enter hidden folders that do not appear with dir without having to remember the correct name.
Repeat a Command
If you want to repeat a command that you have just run, or adjust something in the last command, press the "Up" cursor key to bring it back. You can then adjust it and press enter. Useful if you are trying to work out what switches and options you can use to achieve a certain result. History is not maintained across sessions, but is maintained if you use CLS to clear the screen.
Full Listing of Commands and their Options.
If you want a full list of the commands available to you, just type "help" and they will be listed. You can then type "help <command>" for the instructions.
Similarly, typing /? after the command will also bring up the full list of options available for that command.
A complete list of the built in Commands, along with examples and notes on their use can be found here.
Screen Size and Buffer Size
When you are working with a Command Prompt, it maybe helpful to increase the screen size or the buffer size.
Screen size is what you can actually see on the screen.
Buffer size is what is stored and can be viewed by using the scroll bars at the side.
To change the screen size and buffer size, right click on the icon in the top left corner of the Command Prompt window and choose Properties. Then click on layout.
A good buffer size is height 300, whereas a good screen size is height between 25 and 50.
After pressing OK you will be asked if you want to apply the changes to the shortcut or the current window only. If you are testing, select the current window only.
Deleting Files and Folders
If you want to delete a file, then just type:
del filename.ext
If you want to delete all files in a folder then type
del *.*
similarly if you want to delete all files with a certain extension, then type
del *.ext
(where ext is the extension you want to delete)
To delete a folder, simply enter
del foldername
There are more advanced options for deleting files through the Command Prompt - view the Command Reference for DEL to see the full list.
Note - if you delete a file within a Command Prompt session it does not go in to the recycle bin. It will be deleted immediately.
Advanced Tasks
The command line allows you to more advanced tasks, either using built in tools or additional third party tools. This can include network diagnostics, Email MX record lookup and identifying what your computer is doing with the network or internet.
This information was formally on amset.info, but has now been moved to its own separate domain. You may have been redirected here from amset.info.
Throughout this page you will see this referred to as a command prompt. DOS Prompt and Command Prompt are the same thing.
You should have a Command Prompt open when reading this page so that you can try the commands. Unless stated, you will not damage your data by just moving around your folders.
Opening a Command Prompt
There are two conventional ways to start a Command prompt.
- Start, Programs, Accessories, Command prompt
- Start, Run and type "cmd" (minus quotes) and press enter.
The screenshot below shows a Command Prompt on Windows 7 - it is almost identical on all other versions of Windows.
Command Prompt on Windows Vista, Windows 7 and Windows 2008
On Windows Vista and Windows 7, a standard Command Prompt may not allow you to do everything that you need to. In that case you will need to use an elevated command prompt.
The best way to start an elevated command prompt is to RIGHT click on the shortcut and choose Run As Administrator.
How to tell if the command prompt is elevated
If the prompt is elevated, then the initial path will be C:\Windows\System32. The title bar will also say "Administrator: Command Prompt". If the prompt is not elevated then by default it will start in C:\Users\Username (where username is the username of the account in use) and the title bar will just say "Command Prompt". The example above was configured to start in C:\ .
Closing a command prompt
You can close a command prompt either by clicking on the cross in the corner, typing exit and pressing enter, or choosing Close when right clicking the Command Prompt icon on the task bar.
However command history is not maintained across sessions, so if you have a lengthy command that you want to use again, it needs to be copied out.
Command Prompt Basics
When you are working in Command Prompt, there are a couple of things that usually work:
Many of the commands will have extra options available, known as switches. They are added to the command by entering a "/" then a letter, number or word. These can change how the tool works or handles the information. A common switch would be the help command, which will also give you information on the other switches available.
"command" /?
This will usually bring up information about the command and the available switches. If it doesn't work, try "-?" after the command instead.
"command" > "filename.txt"
This will send the results of the command to a text file instead of the screen. You can include switches as well. This is particularly useful if you are looking at the help information for a command. Look at this example command:
xcopy /? >c:\xcopy.txt
This writes the content of the help command to a file called xcopy.txt located in the root of the C:\ drive.
Stopping a Command
If you start a command it appears to be looping, showing more than you expect, then you can stop it sing the key combination CTRL-C.
If you are interested in simply allowing the text to show, but a screen at a time, then you should use the MORE command.
Copy and Pasting a command in to the window
The first thing to note, which will usually catch newcomers to the Command Prompt out, is that the usual CTRL-C and CTRL-V commands will not work for a command prompt window.
Copying Text
To copy text, such as a long command that you have been using or the results of a command, click on the icon in the top LEFT corner, and then choose Edit, and Mark.
The cursor will then change. You can then use the mouse to highlight the text that you want to copy. Once you have done so, press enter. The highlight will disappear, and the text will be copied in to the clipboard. You can then copy it elsewhere, or in to the same Command Prompt Window.
Pasting Text
To paste text, move the cursor to the point where you want to enter it, using the cursor keys. Then click on the icon in the top left corner and choose Edit, Paste.
CLS
If you have lots of text in your Command Prompt window, this command will clear it. The history of previous commands typed in that session will be maintained.
Moving Between Folders, Listing Folder Contents
There are two commands you will use most
- "CD" (change directory) (minus quotes). This changes directory relevant to the one you are currently working in.
- "DIR" (directory) (minus quotes). This lists the files and directories in the folder that you are in.
The "Dir" command is probably the most basic command. It gives you a listing of all the files and folders that are located in the folder that you are currently open in.
For example, in the screenshot above, we are in the root of the C:\ drive. If a DIR command is carried out at this point, then you will get a result similar to this:
Volume in drive C is System
Volume Serial Number is 1234-5678
Directory of C:\
25/10/2002 23:42 0 AUTOEXEC.BAT
26/10/2002 01:03 0 COMLOG.txt
25/10/2002 23:42 0 CONFIG.SYS
06/02/2003 15:08 0 dir.txt
04/11/2002 20:40 262,144 ntuser.dat
25/10/2002 23:49 <DIR> Documents and Settings
27/01/2003 19:58 <DIR> Program Files
27/01/2003 09:26 <DIR> WINDOWS
5 File(s) 262,144 bytes
3 Dir(s) 12,528,111,616 bytes free
This command does not show you any hidden files. To see hidden files you will need to use the ATTRIB command.
Advanced "dir" commands
You can get a little more advanced with the dir command by putting extra commands after the intitial "dir".
For example:
dir /s
will show the contents of the current folder, and any subfolders that are below. This will produce a very long file listing. You might want to filter the results or send them to a text file (see above).
dir /s something.doc
This command will search through all subdirectories below for a file that matches that file name. Similarly, issuing the command
dir /s *.doc
will list all files that end in .doc (Word files).
More information on the DIR command can be found in the DIR Command Reference.
CD - Change Directory
The CD command is very simple to use. All commands are relative to the directory that you are in. Therefore, using the example output of a "dir" that is shown above, if you want to change to the "Windows" directory, you would type
CD Windows
If you want to change to the "system" directory (which is a sub directory of "windows"), you would enter
CD System
However if you knew that you wanted to change to the system directory immediately, you could type this command instead:
CD Windows\System
However if you were already deep in another directory (for example c:\ documents and settings \username\ local settings) and then wanted to move directly to windows\system then you can do that by putting in an initial backwards slash:
CD \Windows\System
This tells the command to go to the root of the drive, then to the directory Windows and system.
Moving Back Up
You can also move back up the tree, instead of down.
If you want to just return to the root of the drive (C:\) you would just type
cd \ or cd\
If you wanted to just go back one level (to use the earlier example, you were in c:\windows\system and you wanted to be in c:\windows) you would just type:
cd..
Alternatively, if you want to access a totally different directory, for example "Program Files" you could type
cd program files or cd "program files"
When typing directories to change to, if the directory name is unique, then you can use wild cards. For example
cd program*
Directory Entry Shortcut: : If you are on Windows 2000 or XP and you have a Windows Explorer screen open at the location that you want to run a Command Prompt command you could open the Command Prompt and typing a long series of directories or CD commands. Instead, just type CD and then a space, then drag and drop the directory you want to work in to the Command Prompt window. The full path to the directory will be entered, ready for you to press enter.
More information on the CD command can be found in the CD Command Reference.
Change Drive
If you want to run a command against a directory on another drive, such as the D drive, then you need to change to that drive, This is done simply by entering the drive letter and a colon:
d:
On Windows Vista and higher you can also combine the drive letter change and directory by using the full path:
cd d:\downloads
On Windows XP and older, you can still enter the above command, but will then need to do d: . When you do, you will find that you are in the directory where you did the CD command to.
File Renaming
You can rename files in a command prompt.
rename something.txt someone.txt
would rename the file something.txt to someone.txt
Full Rename Command Reference.
Directory Creation
You can create directories from the command prompt:
mkdir something
would create a directory called "something".
If you want a directory with a name that has a space in it, such as "My Files" you need include the command in " ":
mkdir "my files"
This ensures that the directory is created with the space. Without the space you will get a new directory called "my" and an error message.
You can also use the md command instead of mkdir.
Windows Power Toys
If you do a lot of work in the command prompt, then you might be interested in installing the "Command Prompt Here" (Windows 9x, NT and 2000) or "Command Here" (Windows XP) Power Toys. These add a new command the right click menu you get when you click on a directory allowing you to open a Command Prompt in that directory.
You can download these Power Toys from Microsoft's web site.
Changing where the Command Prompt shortcut starts
By default, the command prompt will start in your Home directory. This could be "C:\Documents and Settings\Username" or a network drive. If you want to always start in another location, such as the root of the C: drive, then you can change the Shortcut. Right click on it and choose Properties. Change the value in "Start In" to your preferred location.
Keyboard Short Cuts
There are a couple of shortcuts that you can use from the keyboard instead of typing full directory paths.
Use a Wild Card
If the directory you are wanting to change to is very long but uniquely named, then you can use a wild card instead of typing the entire thing.
For example, instead of:
cd "program files"
you could enter
cd prog*
Enter the wildcard character once you have typed enough characters for Windows to only have one choice.
Using "Tab" to Select Files or Folders - Windows XP/Server 2003 only
Another neat trick if you are using a command prompt on Windows XP or Windows Server 2003 and is to use the "Tab" key to scroll through the files and folders in the current directory. Type the command you want to use as normal, for example "cd" then press tab to cycle through the files and folders until you reach the one you want. Then press enter. You may still have to enter the " as before, so would type " cd " " then press tab until you reached the folder you want to change to, enter the second " to finish off and press enter.
This technique can save a lot of time if you need to change to a directory with a long name.
It will also let you enter hidden folders that do not appear with dir without having to remember the correct name.
Repeat a Command
If you want to repeat a command that you have just run, or adjust something in the last command, press the "Up" cursor key to bring it back. You can then adjust it and press enter. Useful if you are trying to work out what switches and options you can use to achieve a certain result. History is not maintained across sessions, but is maintained if you use CLS to clear the screen.
Full Listing of Commands and their Options.
If you want a full list of the commands available to you, just type "help" and they will be listed. You can then type "help <command>" for the instructions.
Similarly, typing /? after the command will also bring up the full list of options available for that command.
A complete list of the built in Commands, along with examples and notes on their use can be found here.
When you are working with a Command Prompt, it maybe helpful to increase the screen size or the buffer size.
Screen size is what you can actually see on the screen.
Buffer size is what is stored and can be viewed by using the scroll bars at the side.
To change the screen size and buffer size, right click on the icon in the top left corner of the Command Prompt window and choose Properties. Then click on layout.
A good buffer size is height 300, whereas a good screen size is height between 25 and 50.
After pressing OK you will be asked if you want to apply the changes to the shortcut or the current window only. If you are testing, select the current window only.
Deleting Files and Folders
If you want to delete a file, then just type:
del filename.ext
If you want to delete all files in a folder then type
del *.*
similarly if you want to delete all files with a certain extension, then type
del *.ext
(where ext is the extension you want to delete)
To delete a folder, simply enter
del foldername
There are more advanced options for deleting files through the Command Prompt - view the Command Reference for DEL to see the full list.
Note - if you delete a file within a Command Prompt session it does not go in to the recycle bin. It will be deleted immediately.
Advanced Tasks
The command line allows you to more advanced tasks, either using built in tools or additional third party tools. This can include network diagnostics, Email MX record lookup and identifying what your computer is doing with the network or internet.
CMD All Commands
An A-Z Index of the Windows CMD command line
   ADDUSERS Add or list users to/from a CSV file
   ADmodcmd Active Directory Bulk Modify
   ARP      Address Resolution Protocol
   ASSOC    Change file extension associations•
   ASSOCIAT One step file association
   AT       Schedule a command to run at a specific time
   ATTRIB   Change file attributes
b
   BCDBOOT  Create or repair a system partition
   BCDEDIT  Manage Boot Configuration Data
   BITSADMIN Background Intelligent Transfer Service
   BOOTCFG  Edit Windows boot settings
   BROWSTAT Get domain, browser and PDC info
c
   CACLS    Change file permissions
   CALL     Call one batch program from another•
   CERTREQ  Request certificate from a certification authority
   CERTUTIL Utility for certification authority (CA) files and services
   CD       Change Directory - move to a specific Folder•
   CHANGE   Change Terminal Server Session properties
   CHKDSK   Check Disk - check and repair disk problems
   CHKNTFS  Check the NTFS file system
   CHOICE   Accept keyboard input to a batch file
   CIPHER   Encrypt or Decrypt files/folders
   CleanMgr Automated cleanup of Temp files, recycle bin
   CLIP     Copy STDIN to the Windows clipboard
   CLS      Clear the screen•
   CMD      Start a new CMD shell
   CMDKEY   Manage stored usernames/passwords
   COLOR    Change colors of the CMD window•
   COMP     Compare the contents of two files or sets of files
   COMPACT  Compress files or folders on an NTFS partition
   COMPRESS Compress one or more files
   CONVERT  Convert a FAT drive to NTFS
   COPY     Copy one or more files to another location•
   CSCcmd   Client-side caching (Offline Files)
   CSVDE    Import or Export Active Directory data
d
   DATE     Display or set the date•
   DEFRAG   Defragment hard drive
   DEL      Delete one or more files•
   DELPROF  Delete user profiles
   DELTREE  Delete a folder and all subfolders
   DevCon   Device Manager Command Line Utility
   DIR      Display a list of files and folders•
   DIRQUOTA File Server Resource Manager Disk quotas
   DIRUSE   Display disk usage
   DISKPART Disk Administration
   DISKSHADOW Volume Shadow Copy Service
   DISKUSE  Show the space used in folders
   DOSKEY   Edit command line, recall commands, and create macros
   DriverQuery Display installed device drivers
   DSACLs   Active Directory ACLs
   DSAdd    Add items to active directory (user group computer)
   DSGet    View items in active directory (user group computer)
   DSQuery  Search for items in active directory (user group computer)
   DSMod    Modify items in active directory (user group computer)
   DSMove   Move an Active directory Object
   DSRM     Remove items from Active Directory
e
   ECHO     Display message on screen•
   ENDLOCAL End localisation of environment changes in a batch file•
   ERASE    Delete one or more files•
   EVENTCREATE Add a message to the Windows event log
   EXIT     Quit the current script/routine and set an errorlevel•
   EXPAND   Uncompress CAB files
   EXTRACT  Uncompress CAB files
f
   FC       Compare two files
   FIND     Search for a text string in a file
   FINDSTR  Search for strings in files
   FOR /F   Loop command: against a set of files•
   FOR /F   Loop command: against the results of another command•
   FOR      Loop command: all options Files, Directory, List•
   FORFILES Batch process multiple files
   FORMAT   Format a disk
   FREEDISK Check free disk space
   FSUTIL   File and Volume utilities
   FTP      File Transfer Protocol
   FTYPE    File extension file type associations•
g
   GETMAC   Display the Media Access Control (MAC) address
   GOTO     Direct a batch program to jump to a labelled line•
   GPRESULT Display Resultant Set of Policy information
   GPUPDATE Update Group Policy settings
h
   HELP     Online Help
   HOSTNAME Display the host name of the computer
i
   iCACLS   Change file and folder permissions
   IEXPRESS Create a self extracting ZIP file archive
   IF       Conditionally perform a command•
   IFMEMBER Is the current user a member of a group
   IPCONFIG Configure IP
   INUSE    Replace files that are in use by the OS
l
   LABEL    Edit a disk label
   LOGMAN   Manage Performance Monitor logs
   LOGOFF   Log a user off
   LOGTIME  Log the date and time in a file
m
   MAKECAB  Create .CAB files
   MAPISEND Send email from the command line
   MBSAcli  Baseline Security Analyzer
   MEM      Display memory usage
   MD       Create new folders•
   MKLINK   Create a symbolic link (linkd) •
   MODE     Configure a system device COM/LPT/CON
   MORE     Display output, one screen at a time
   MOUNTVOL Manage a volume mount point
   MOVE     Move files from one folder to another•
   MOVEUSER Move a user from one domain to another
   MSG      Send a message
   MSIEXEC  Microsoft Windows Installer
   MSINFO32 System Information
   MSTSC    Terminal Server Connection (Remote Desktop Protocol)
n
   NET      Manage network resources
   NETDOM   Domain Manager
   NETSH    Configure Network Interfaces, Windows Firewall & Remote access
   NBTSTAT  Display networking statistics (NetBIOS over TCP/IP)
   NETSTAT  Display networking statistics (TCP/IP)
   NLSINFO  Display locale information (reskit).
   NLTEST   Network Location Test (AD)
   NOW      Display the current Date and Time
   NSLOOKUP Name server lookup
   NTBACKUP Backup folders to tape
   NTDSUtil Active Directory Domain Services management
   NTRIGHTS Edit user account rights
   NVSPBIND Modify network bindings
o
   OPENFILES Query or display open files
p
   PATH     Display or set a search path for executable files•
   PATHPING Trace route plus network latency and packet loss
   PAUSE    Suspend processing of a batch file and display a message•
   PERMS    Show permissions for a user
   PERFMON  Performance Monitor
   PING     Test a network connection
   POPD     Return to a previous directory saved by PUSHD•
   PORTQRY  Display the status of ports and services
   POWERCFG Configure power settings
   PRINT    Print a text file
   PRINTBRM Print queue Backup/Recovery
   PRNCNFG  Configure or rename a printer
   PRNMNGR  Add, delete, list printers and printer connections
   ProcDump Monitor an application for CPU spikes
   PROMPT   Change the command prompt•
   PsExec     Execute process remotely
   PsFile     Show files opened remotely
   PsGetSid   Display the SID of a computer or a user
   PsInfo     List information about a system
   PsKill     Kill processes by name or process ID
   PsList     List detailed information about processes
   PsLoggedOn Who's logged on (locally or via resource sharing)
   PsLogList  Event log records
   PsPasswd   Change account password
   PsPing     Measure network performance
   PsService  View and control services
   PsShutdown Shutdown or reboot a computer
   PsSuspend  Suspend processes
   PUSHD    Save and then change the current directory•
q
   QGREP    Search file(s) for lines that match a given pattern
   Query Process / QPROCESS  Display processes
   Query Session / QWinsta   Display all sessions (TS/Remote Desktop)
   Query TermServer /QAppSrv List all servers (TS/Remote Desktop)
   Query User    / QUSER     Display user sessions (TS/Remote Desktop)
r
   RASDIAL  Manage RAS connections
   RASPHONE Manage RAS connections
   RECOVER  Recover a damaged file from a defective disk
   REG      Registry: Read, Set, Export, Delete keys and values
   REGEDIT  Import or export registry settings
   REGSVR32 Register or unregister a DLL
   REGINI   Change Registry Permissions
   REM      Record comments (remarks) in a batch file•
   REN      Rename a file or files•
   REPLACE  Replace or update one file with another
   Reset Session  Delete a Remote Desktop Session
   RD       Delete folder(s)•
   RMTSHARE Share a folder or a printer
   ROBOCOPY Robust File and Folder Copy
   ROUTE    Manipulate network routing tables
   RUN      Start | RUN commands
   RUNAS    Execute a program under a different user account
   RUNDLL32 Run a DLL command (add/remove print connections)

s
   SC       Service Control
   SCHTASKS Schedule a command to run at a specific time
   SET      Display, set, or remove session environment variables•
   SETLOCAL Control the visibility of environment variables•
   SetSPN   Edit Service Principal Names
   SETX     Set environment variables
   SFC      System File Checker
   SHARE    List or edit a file share or print share
   ShellRunAs Run a command under a different user account
   SHIFT    Shift the position of batch file parameters•
   SHORTCUT Create a windows shortcut (.LNK file)
   SHUTDOWN Shutdown the computer
   SLEEP    Wait for x seconds
   SLMGR    Software Licensing Management (Vista/2008)
   SORT     Sort input
   START    Start a program, command or batch file•
   STRINGS  Search for ANSI and UNICODE strings in binary files
   SUBINACL Edit file and folder Permissions, Ownership and Domain
   SUBST    Associate a path with a drive letter
   SYSMON   Monitor and log system activity to the Windows event log
   SYSTEMINFO List system configuration
t
   TAKEOWN  Take ownership of a file
   TASKLIST List running applications and services
   TASKKILL End a running process
   TELNET   Communicate with another host using the TELNET protocol
   TIME     Display or set the system time•
   TIMEOUT  Delay processing of a batch file
   TITLE    Set the window title for a CMD.EXE session•
   TLIST    Task list with full path
   TOUCH    Change file timestamps
   TRACERT  Trace route to a remote host
   TREE     Graphical display of folder structure
   TSDISCON Disconnect a Remote Desktop Session
   TSKILL   End a running process
   TSSHUTDN Remotely shut down or reboot a terminal server
   TYPE     Display the contents of a text file•
   TypePerf Write performance data to a log file
   TZUTIL   Time Zone Utility
v
   VER      Display version information•
   VERIFY   Verify that files have been saved•
   VOL      Display a disk label•
w
   W32TM    Time Service
   WAITFOR  Wait for or send a signal
   WEVTUTIL Clear event logs, enable/disable/query logs
   WHERE    Locate and display files in a directory tree
   WHOAMI   Output the current UserName and domain
   WINDIFF  Compare the contents of two files or sets of files
   WINRM    Windows Remote Management
   WINRS    Windows Remote Shell
   WMIC     WMI Commands
   WUAUCLT  Windows Update
x
   XCACLS   Change file and folder permissions
   XCOPY    Copy files and folders
   ::       Comment / Remark•
VOIP - Free Call Using Internet
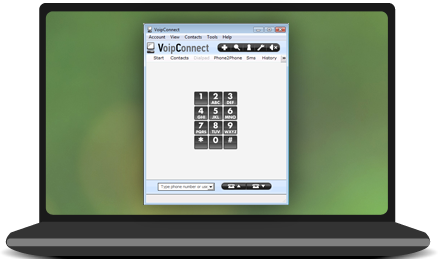
Step 1 : Go To https://www.freecall.com .
Step 2 : Click On "Desktop" For In Pc and Download ( You Also Click Another Devices If You Need)
Step 3 : After Downloading, Simply Just Install It. and Open
Step 4 : Create A account Fill All the Details Correctly.
Step 5 : Verify Your Email Id and Phone No. (Country Code Before Your Number Ex : +91xxxxxxxxxx)
Step 6 : Enjoy The Free Calls Over Internet.............. ( Only 2 Calls Free)
All Bollywood Movies Download Link - b/w Old to 2015
Download all Bollywood Movies Released Before 2015, 30 Feb .....
1 2 3:
A:
B:
C:
D:
E:
F:
G:
H:
I:
J:
K:
L:
M:
N:
O:
P:
Q:
R:
S:
T:
U:
V:
W:
X:
Y:
Z:
Subscribe to:
Comments (Atom)